At the time it seemed so lucky to find a cache of iris tubers at the rubbish dump but some years later I am wiser. I have learnt that when you aren't looking they rapidly multiply and push and shove each other across pathways and over walls smothering all other more delicate plants. In no time at all you have so many that you might, in desperation, consider taking a boot load to the rubbish dump! But, the idea of rubbish dumps, let alone using energy to take anything to them is a tricky one for me, so I have tried to find other, more positive, ways to use these plants.
Cutting the leaves off after the plants have flowered has always seemed to me to be a brutal and ugly way to deal with dying iris leaves. So in this garden at least, they are allowed to die naturally and as the leaves turn brown I gather them. If I am going to use them straight away I do this in the morning, after they have been softened by the dew and put them in the shade till I am ready to work. If not I tie them in bunches and dry them.

Plaiting is something that can be done in those moments when you don’t really want to have to think too much about what you are doing, so talking, travelling and watching tv are all good companion activities. A trip to the beach for the day is for me the perfect opportunity to do some plaiting so I damp a few bunches by dipping them quickly in water and shaking off the excess, put them in a plastic bag and stick them on the back shelf in the car in the sunshine. A couple of hours later they come out of the bag on the beach in perfect condition for plaiting or rope making, both of which can later be stitched into baskets or mats.


Of all the things that I have made for my own home these table mats probably give me the most pleasure because I use them several times a day and they do everything I want from them. They look attractive, protect the table, never need cleaning, smell nice (a musky woody scent) and inadvertently they tidy up the irises. There is something very satisfying about turning an otherwise rather pointless activity i.e. pulling off dead iris leaves so the garden looks better, into a fruitful one, making something useful out of them.
So for anyone interested in making iris leaf table mats here, very simply, is my method.
Harvest the leaves and either use them damp with morning dew or damp them just before you want to use them.
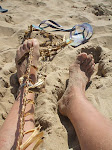
Take 3 leaves and tie them tightly in the middle with a piece of string that you can tie onto something solid such as a door knob or table leg.This allows you to pull on the plait which frees up your hands to concentrate on it and makes it easier to get an even plait. When working on the beach I trap the plait between my toes.
Divide the leaves into three even bunches and plait them as if you were braiding hair. My plaits are folded inwards at the edges to give a smooth edge.
The plait is kept an even thickness by adding new leaves as and when necessary, I join them usually on the right because it makes trimming the ends quicker and easier with them all pointing in the same direction. They are put in by the butt leaving a little bit sticking out.
Here is a short video clip
I make approximately 15 metres of plait for a 25cm diameter table mat.The plait is dried naturally out of direct sunlight or extreme heat. And then all the bits sticking out are trimmed off.
The stitching is done with jute, polypropylene or cotton cord i.e whatever I have available that is suitable. Starting at the end that was tied onto something I roll the plait tightly and stitch through a small coil of a couple of rows two or three times to hold it all together. I then continue the stitching working in a spiral by going through the fixed plait and the free plait using a simple running or tacking stitch.
As I near the 25cm diameter I estimate where the plait needs to finish and cut it at that point I then unravel the plait, cut some pieces out to thin it down and re plait it so that the end just tapers away to almost nothing. That is stitched in place and the mat is ready for use.